Skip to content

2016

Tiles Page

Cruscotto

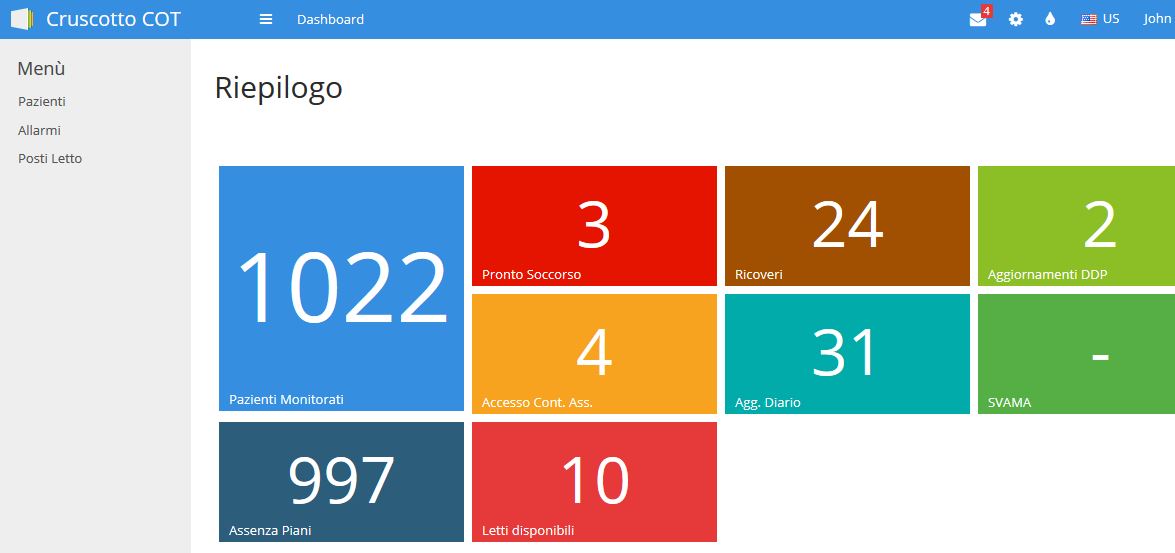
For my new application, I had to develop a summary page with all alarms in a single location: a tiles page is perfect for this purpose!

Of course, data has to be fetched using AJAX, however I didn't have a tiles module ready so this was the right moment to start developing one!

A tiles page is implemented like an unordered list:

<ul class="tiles">
  <li class="blue high long">
    <a href="pazienti_cot">
      <span class='count'></span>
      <span class='name'>Pazienti Monitorati</span>
    </a>
  </li>
  <li>
    ...
  </li>
</ul>

I just added a data-ajax-source data column on the ui tag (here's where we will fetch the counts) and a data-value that specifies the row where to get the counts. The AJAX data source will be in the same format as a datatables data source (because I'm lazy and I can reuse the same module hehe):

{
    "aaData":[
      ["PAZIENTI","1021"],
      ["TERR-RICOVERO","1"],
      ["TERR-ASSENZAPIANI","997"],
      ["OSP-DDP","5"],
      ["TERR-AGGDIARIOCA","30"],
      ["OSP-RICOVERO","24"],
      ["OSP-PS","4"],
      ["TERR-ACCESSOCA","5"],
      ["LETTI","10"]
    ],
    "iTotalRecords":"9",
    "iTotalDisplayRecords":"9",
    "sEcho":null
}

The tiles widget will be called as this:

  tiles-widget.mi,
    tiles => {
      json => "json/riepilogo.json",
      columns => [
        { caption => 'Pazienti Monitorati', value => 'PAZIENTI',          class => 'blue high long', href => 'pazienti_cot' },
        { caption => 'Pronto Soccotso',     value => 'OSP-PS',            class => 'red long',       href => '#' },
        { caption => 'Ricoveri',            value => 'OSP-RICOVERO',      class => 'brown long',     href => '#' },
        { caption => 'Aggiornamenti DDP',   value => 'OSP-DDP',           class => 'lime long',      href => '#' },
        { caption => 'Accesso Cont. Ass.',  value => 'TERR-ACCESSOCA',    class => 'orange long',    href => '#' },
        { caption => 'Agg. Diario',         value => 'TERR-AGGDIARIOCA',  class => 'teal long',      href => '#' },
        { caption => 'SVAMA',               value => 'TERR-SVAMA',        class => 'satgreen long',  href => '#' },
        { caption => 'Assenza Piani',       value => 'TERR-ASSENZAPIANI', class => 'satblue long',   href => '#' },
        { caption => 'Letti Disponibili',   value => 'LETTI',             class => 'lightred long',  href => 'letti_cot' },
      ]
    }
that will create a tiles html structure like the one above:

            <ul class="tiles" data-ajax-source="{json} %>">
% foreach my $box (@{$.tiles->{columns}}) {
               <li class="{class} %>" data-value="{value} %>">
                <a href="{href} %>">
                  <span class='count'></span>
                  <span class='name'>{caption} %></span>
                </a>
              </li>
% }
            </ul>

then the magic starts in the sentosa.js module:

function init_tile(tile) {
    $.getJSON( tile.attr("data-ajax-source"), function( data ) {
        // create an hash from the json aaData
        var a = data["aaData"];
        var h = {};
        for (var i=0; i< a.length; i++) {
            h[ a[i][0] ] = a[i][1];
        };
        // loop through all elements, and set data from the hash
        // (yes, I could directly read aaData and put it inside the html... but I also want to put - where data is not avaliable, so I have to use an hash first)
        $("li", tile).each(function () {
            $('span.count', this).text(h[$(this).attr("data-value")] || '-');
        });
    });
}

okay, this "init" will load the JSON, parse it in a map data structure, then loop through each li element and put the value accordingly to the data-value tag (or put the - symbol if not available). I will then call it every some seconds:

setInterval (function autoRefresh() {
    /* refresh all tiles */
    $('ul[data-ajax-source]').each(function () {
        init_tile($(this));
    });
}, 30000);

This link looks interesting if I want to build a more professional and reusable plugin: Basic Plugin Creation

¡Hasta pronto!

Shared Recordset Definition

I think that the modules I developed for Sentosa Autoforms are quite elegant and flexible (expecially the Sentosa::SQL module, and the DataDatables and JSON modules) so I decided to reuse them! However I don't like the fact that Sentosa Autoforms is all driven by database data.. while it's sometimes very convenient, I don't like the layer of complexity that it adds.

So I started to work on it, trying to figure out a simpler solution!

First of all, I needed to store all recordset information on a variable, shared to all components. The hashref recordset goes to the Base.mp pure perl component:

my $recordset = {
  # Allarms
  "alarms" => {
    description => 'Alarms',
    connection => { db => 'dbi:Pg:dbname=dbname;host=10.10.10.10', username => 'myusername', password => 'mypassword' },
    source => "alarms",
    pk => 'id',
    columns => [
        { col => 'paziente',                 caption => 'Paziente', type => 'text', 'link-id' => '4' },
        { col => 'data_nascita',             caption => 'Data Nasc', type => 'text' },
        { col => 'dataora',                  caption => 'Data/ora PS', type => 'text' },
        { col => 'osp_ps_priorita_ingresso', caption => 'Priorità', type => 'text' },
        { col => 'link_fascicolo',           caption => 'Fascicolo', type => 'hidden' }
      ],
    json => 'json/alarms.json'
  },
}

Pretty elegant! Also I can use all kinds of Perl stuff to make it more tidy or more compact (e.g. I can specify a connections hash_ref, and I can calculate the array_ref columns somehow.. also, Sentosa has to process every query every time we access a recordset, while with this systems I can pre-calculate all queries at runtime the first time we access it).

How can I share this recordset data to all components? I can specify a method at the end of the Base.mp component:

method getrecordset($rs) {
  return $recordset->{$rs};
}

and then the default handler inside the json directory can be just like this:

<%flags>
extends => '../Base.mp';
</%flags>
%class
  has '_id';
  has '_app';

  has 'iDisplayStart';
  has 'iDisplayLength';
  has 'iColumns';

  has 'sEcho';
</%class>
<%init>
  my ($recordset_name, $ext) = $m->path_info =~ /(.*)(\.json)$/;
  if (! $.getrecordset($recordset_name)) {
    $m->not_found();
  }
</%init>
<&
  ../query-data-widget.mi,
    obj => {
      source => $.getrecordset($recordset_name)->{source},
      pk     => $.getrecordset($recordset_name)->{pk},
      db     => $.getrecordset($recordset_name)->{connection}->{db},
      name   => 'allarmi_osp_ricovero',
      description => $.getrecordset($recordset_name)->{description},
      username => $.getrecordset($recordset_name)->{connection}->{username},
      password => $.getrecordset($recordset_name)->{connection}->{password}
    },
    columns => $.getrecordset($recordset_name)->{columns},

    iDisplayStart => $.iDisplayStart,
    iDisplayLength => $.iDisplayLength,
    iColumns => $.iColumns,
    sEcho => $.sEcho,
    searchArgs => $.args
&>

it will inherit only from the Base.mp (no html, only perl!) ... and yes, I know this is a little ugly and not too elegant, but at least I can use the query-data-widget (and the query-widget as well) without major updates. I will work on making it better :)

Ah only one thing has to be updated! instead of working on the $.columns object I figured out that I have to work on a local copy of the object:

    use Clone 'clone';
    my $local_columns = clone($.columns);

otherwise, everytime I modify the columns object to add a temporary filter, the next time the filter is still there - because it's a hash_ref!

To call the query widget I use this:

<&
  query-widget.mi,
    query => {
      id => 'osp-ps',
      json => $.getrecordset($recordset_name)->{json},
      description => $.getrecordset($recordset_name)->{description},
      pk => $.getrecordset($recordset_name)->{pk},
      columns => $.getrecordset($recordset_name)->{columns},
      params => { 'table_link'  => undef, 'hide_title'  => 1, 'hide_top'    => 1, 'hide_bottom' => 0 }
    }
&>

Well this environment is much more comfortable, I think I can add plenty of improvements soon, and I think I can write a good manual of how to use those components. See you soon!

SQL Markdown Builder

I like text editors, especially Sublime Text. And I like to work at the command line (on Linux, on Mac... but even on Windows 10 it has become very nice).

So it's pretty normal that everything I write is in Markdown syntax!

Since I work every day with SQL, and every day I have to prepare quick reports, extract some data, share some tables, share some rows... I needed a tool to run a SQL query against a database that returns a table in Markdown format!

This way I can easily copy & paste to a new mail, and format it nicely and professionally with markdown-here, quickly and without becoming crazy.

So I quickly wrote this tool and I called SQL Markdown Builder because it can easily be integrated with Sublime Text, even if it is not a native plugin.

Yes I know this is a little off topic from Mason and Sentosa, but this tool is written in Perl and... I included it in Sentosa anyway! So let's start!

Getting Started

Make sure you have installed perl, File::Slurp, Getopt::Long, DBI, and the DBD libraries for your database:

cpanm File::Slurp
cpanm Getopt::Long
cpanm DBI
cpanm DBD::SQLite
cpanm DBD::Pg
cpanm DBD::mysql
...

Run a query

Once everything is installed, you can write a single query, or more queries separated by a ; in a .SQL text file:

drop table if exists gardens;

create table gardens (
    id integer primary key,
    name varchar(100),
    city varchar(100)
);

insert into gardens (name, city) values
('Gardens By The Bay', 'Singapore'), ('Hyde Park', 'London'),
('Central Park', 'New York'), ('Villa Borghese', 'Rome'),
('Princes Street Gardens','Edinburgh');

select * from gardens;

and you can run your query file at the command line:

perl sqlbuild.pl -c dbi:SQLite:dbname=test.sqlite3 -s query.sql

the connection string is in the DBI format, this example is for SQLite so we don't need to specify a username or a password.

SQL Markdown Builder will execute every single query in sequence against the specified database. If the query is an INSERT or an UPDATE query, it will return '0 rows', otherwise it will return the results in Markdown format (nicely aligned):

0 rows
0 rows
0 rows

id | name                   | city
---|------------------------|----------
1  | Gardens By The Bay     | Singapore
2  | Hyde Park              | London
3  | Central Park           | New York
4  | Villa Borghese         | Rome
5  | Princes Street Gardens | Edinburgh

If some columns become too big, you can specify the maximum size of a column with -mw parameter (or use -h to see all parameters).

Instead of using the command line, you can also specify all connection strings, usernames, passwords inside the .SQL file itself:

/*
  conn="dbi:SQLite:dbname=test.sqlite3"
  username=""
  password=""
*/

This is very handy but not too secure (other users might peek inside your files, and also updating a password might become complicated).

Integration with Sublime Text

This is for Windows, but Linux and OSX will be very similar.

Just get the provided file Sql-mk-build.sublime-build, update the working_dir:

{
    "cmd": ["perl", "sqlbuild.pl", "-s", "$file" ],
    "working_dir": "c:\\GitHub\\Sql-mk-builder\\"
    "selector": "*.sql"
}

and move it to the build directoy:

C:\Users\YOURUSERNAMEHERE\AppData\Roaming\Sublime Text 3\Packages\User

then you can edit your .SQL files with Sublime Text, and see the results using CTRL+B.

Happy SQL & Markdown!

Systemctl start sentosa.service

I just started to publish my Sentosa web portal and users of my company are now starting to use it. Great!

I wanted to add a service on my CentOS server and I wanted to manage it with Systemd.

First I created a /etc/systemd/system/sentosa.service file that contains:

[Unit]
Description=Sentosa Autoforms
After=network.target

[Service]
ExecStart=/usr/local/bin/plackup -E production --port 5001 --access-log /var/www/apps/sentosa/logs/access.log /var/www/apps/sentosa/bin/app.psgi

the app.psgi is the standard file from GitHub, I just disabled the debug mode.

Now I can start, restart, stop my service with:

systemctl start sentosa.service
systemctl restart sentosa.service
systemctl stop sentosa.service

And I can monitor the tail of the logs with:

journalctl -u sentosa.service -f