Skip to content

2017

Postgresql: detect record changes

In MySQL we can have a timestamp column which is automatically set to the current date/time whenever the record is inserted or updated:

create table mytable (
  id int primary key,
  value varchar(100),
  updated_timestamp timestamp not null default CURRENT_TIMESTAMP on update CURRENT_TIMESTAMP
)

In PostgreSQL we can have a timestamp column which is automatically set to the current date/time whenever the record is inserted:

create table mytable (
  id int primary key,
  value varchar(100),
  updated_timestamp timestamp not null default CURRENT_TIMESTAMP
)

but to have it updated whenever there's an update in the row we have to write a trigger. First we have to write a function that changes the updated_timestamp column in a table:

CREATE OR REPLACE FUNCTION set_update_timestamp()
RETURNS TRIGGER AS $$
BEGIN
   NEW.updated_timestamp = now(); 
   RETURN NEW;
END;
$$ language 'plpgsql';

then we create the trigger:

CREATE TRIGGER mytable_update
BEFORE UPDATE ON mytable
FOR EACH ROW
  EXECUTE PROCEDURE set_update_timestamp();

there's still a little difference between MySQL and PostgreSQL, as MySQL will execute the update only whenever there's an actual update:

insert into mytable (id, value) values (1, 'Hello');
-- updated_timestamp set to current timestamp

update mytable set value='Hello' where id=1;
-- PostgreSQL will update the updated_timestamp column
-- but MySQL no because there are no changes in record

update mytable set value='Hi!' where id=1;
-- both MySQL and PostgreSQL will update the updated_timestamp column

but we can add more flexibility adding some conditions to the trigger:

CREATE TRIGGER mytable_update
BEFORE UPDATE ON mytable
FOR EACH ROW
  WHEN ((old.value)::text IS DISTINCT FROM (new.value)::text)
  EXECUTE PROCEDURE set_update_timestamp()

More tables can share the same set_update_timestamp() function if they share the same updated_timestamp column.

Postgresql: Detect Status Changes in a Table

This is another challenging problem I had, and it took me some hours of work to find out how to solve it. I was very tempted to use a script in a procedural language like Perl, which would make the problem easy and the solution straightforward, but there had to be a pure SQL way and here's how I did it!

The problem

Anytime a patient has to do some kind of (non urgent) surgery, we create a new event with all patient info on the main table Event, then we log all updates to this event on the Changes table.

  • at first the patient is in it's initial state: he/she has to provide documents, papers, previous results, insurance, allergies, etc.
  • then the preparation phase can begin: he/she has to do some tests, talk to some doctors, wait for the results;
  • when everything the preparation phase is completed, he/she's ready and he has to wait for instructions;
  • then the hospital will give an appointment, which can be updated (different room, different time) or changed (different day);
  • finally he/she's got the surgery and the event is considered completed:
id event_id status change_date other
1 1 Initial 2017-10-07 ...
2 1 Initial 2017-10-08 ...
3 1 Preparation 2017-10-09 ...
4 1 Preparation 2017-10-10 ...
5 1 Ready 2017-10-11 ...
6 1 Appoinment-Given 2017-10-12 ...
7 1 Appoinment-Given 2017-10-13 ...
8 1 Appoinment-Given 2017-10-14 ...
9 1 Completed 2017-10-15 ...

There are a lot of useful informations than can be calculated here: how long does it take for a Ready event to be Completed? How long does it take the initial or the preparation phase? And what about the whole process?

The table is not normalized: it is optimized for entering data, not for querying it, that's why the query isn't simple.

Detect status changes

To detect status changes we can make use of the LAG window function:

LAG(status, 1, status) over (PARTITION BY event_id ORDER BY id)

that will return, for every row, the status value of the previous (1) row. If there's no such row in the window partitioned by the event_id, it will return the current status. Then we can compare the previous value with the current value, and return 1 if a change is detected, and 0 otherwise:

with c1_detect_changes as (
select
  event_id,
  id,
  status,
  case when LAG(status, 1, status) OVER(PARTITION BY event_id ORDER BY id) = status then 0 else 1 end as n
from
  changes
order by
  event_id, id
)
select * from c1_detect_changes

and the result is:

event_id id status n
1 1 Initial 0
1 2 Initial 0
1 3 Preparation 1
1 4 Preparation 0
1 5 Ready 1
1 6 Appoinment-Given 1
1 7 Appoinment-Given 0
1 8 Appoinment-Given 0
1 9 Done 1

(it really doesn't matter if the first row is set to 0 -no status change- or 1 -status change detected-, but what's really important is that all other status changes are detected correctly with a 1).

Create a group for all consecutive rows with the same status

We can calculate a running sum:

sum(n) over (partition by event_id order by id) g

our query becomes:

with c2_running_sum as (
select
  event_id,
  id,
  status,
  sum(n) over (partition by event_id order by id) g
from c1_detect_changes
)
select * from c2_running_sum;

can you see it? Every row that shares the same consecutive status is now part of the same group:

event_id id status g
1 1 Initial 0
1 2 Initial 0
1 3 Preparation 1
1 4 Preparation 1
1 5 Ready 2
1 6 Appoinment-Given 3
1 7 Appoinment-Given 3
1 8 Appoinment-Given 3
1 9 Done 4

Get the first status change for each group

Now we can get the first (minimum) id for every group (g):

whti c3_get_first_id_per_group as (
select event_id, g, status, min(id) as min_id
from c2_running_sum
group by event_id, g, status
)
select * from c3_get_first_id_per_group;

and here's the result:

event_id min_id status
1 9 Done
1 6 Appoinment-Given
1 3 Preparation
1 5 Ready
1 1 Initial

Back to Initial

We also have an additional requirement: sometimes it might happen that an event has to be sent back to the Initial status, so I want to ignore all things that happened previously, what is done is done, and only consider the last Initial status:

with c4_get_last_initial as (
select
  event_id,
  max(min_id) max_initial
from
  c3_get_first_id_per_group
where
  status='Initial'
group by
  event_id
),
c5_latest_status_changes as (
select c3.event_id, min_id from c3_get_first_id_per_group as c3 inner join c4_get_last_initial as c4 on c3.event_id=c4.event_id where c3.min_id >= c4.max_initial
)

c4 will find the latest initial status, c5 will return all events after the last initial status.

Getting all the rows

The latest query C5 will return the event_id and the min_id of the rows to be considered:

select changes.*
from changes
where (event_id, id) in (select * from c5_latest_status_changes)

and we can pivot the results with FILTER (if we have at least PostgreSQL 9.4)

select
  event_id,
  max(change_date) filter (where status='Initial') as initial,
  max(change_date) filter (where status='Preparation') as preparation,
  max(change_date) filter (where status='Ready') as ready,
  max(change_date) filter (where status='Appointment-Given') as app_given,
  max(change_date) filter (where status='Done') as done
from
  changes where (event_id, id) in (select * from c5)
group by
  event_id

A fiddle to play with some data is here.

Appointments Table and Recursive Query in PostgreSQL

My company uses a booking table like this simplified one:

id next_id status various_info booking_date appointment_date transfer_date cancel_date
1 B Paul from New York 2017-10-01 2017-10-05
2 3 T Lisa from London 2017-10-02 2017-10-05 2017-10-04
3 B Lisa from London 2017-10-04 2017-11-03
4 C Tom from Glasgow 2017-10-07 2017-11-04 2017-10-25

as you can see, anytime a user books an appointment, a row is added to this table where we store various user info, the booking date which is the current_date, and the date of the appointment. When the booking is active, the status of the row is B = Booked.

Users can ask to transfer an existing booking to a new date, so we just create a new row with the status B = Booked and we set the old appointment to T = Transferred setting also the transfer_date to the current date and the next_idfield to the newly created appointment.

This makes things easy whenever we want to find all active bookings:

select various_info, appointment_date
from   appointments
where  status = 'B'
;

but to find when a booking was booked for the first time we need a recursive query. We start with this:

WITH RECURSIVE recursive_bookings AS (
  /* non recursive/root part: get all active bookings */
select
  b.id,
  b.id AS last_id,
  1 AS level
from
  bookings b
where
  b.status = 'B'

union all
  /* recursive part: go back to the previous transferred bookings */
select
  a.id,
  r.last_id,
  r.level+1
from
  recursive_bookings r join bookings a on a.next_id = r.id and a.status='T'
)
select * from recursive_bookings
;

this query on the dataset above will return the following rows:

id last_id level
1 1 1
3 3 1
2 3 2

as you can see, for the booking with last_id=3 we have multiple rows: - id=3 and level 1 which is the last and active one - id=2 and level 2 which is the first time the user booked the appointment and there might be many others in case the same booking is transferred multiple times.

If we want to get the first time an appointment was booked we have to only get the row per each last_id

select s.id as first_id, s.last_id
from (
  select id, last_id, level, max(level) OVER (PARTITION BY last_id) AS maxlevel FROM recursive_bookings
) s
where
  (s.level = s.maxlevel)
;

then we can play around this query and return other columns we might be interested in.

I have also one additional column which stores the reason why the appointment was transferred, and it's stored on the row which is transferred. The reason can be either C = the company had to transfer the appointment, because the slot was no longer available or U = the user wanted to transfer the appointment. If I want to ignore the transfers caused by the user, I'll have to add this condition to the join:

recursive_bookings r join bookings a on a.next_id = r.id and a.status='T' and a.reason='C'

this will ignore all transfers caused by the user (and all transfers caused by the company but before user intervention, which might be desiderable or might not, but this depends on what the requirements are).

Markdown filter for Mason2

Mason comes with some built-in filters that can be used to process portions of content in a component. The standard way to invoke a filter is in a block:

    % $.Trim \{\{
        This string will be trimmed
    % \}\}
    # end Trim

but filters can appear also inside a <% %> tag:

<% $content | NoBlankLines,Trim %>

More details can be found at the official Mason::Manual::Filters page. Here's how to create a custom filter:

package MyApp::Filters;
use Mason::PluginRole;

method Upper () {
    return sub { uc($_[0]) }
}

method Lower () {
    return sub { lc($_[0]) }
}

1;

I wanted to use a custom filter that converts Markdown text to HTML, so I installed the Text::Multimarkdown module and I created a filter like this:

package MyApp::Filters;
use Mason::PluginRole;
use Text::MultiMarkdown qw(markdown);

method Markdown () {
    my $m = Text::Markdown->new;
    return sub { markdown($_[0]) }
}

1;
which I put in lib/MyApp directory. Then I tried it in a index.mc page:

<%class>
  with 'Markdown::Filters';
</%class>

<%
"
## Markdown

This page is written using **markdown** syntax:

- it's using the `Text::MultiMarkdown` library
- it's a lot of fun
- `Mason2` is great!
" | Markdown
%>

another way using the block invocation syntax:

<%class>
  with 'Markdown::Filters';
</%class>

<h1>Let's try the block invocation syntax</h1>

% $.Markdown \{\{
## Do tables work?

id | description
---|------------
01 | begin at the beginning
02 | go on till you come to the end
03 | then stop

yes `MultiMarkdown` supports tables as well.
% \}\}

one more way is to use a Base component, telling to process all inner components with Markdown:

<%class>
  with 'Markdown::Filters';
</%class>

<%augment wrap>
  <html>
    <head>
      <link rel="stylesheet" href="/static/css/style.css">
      <title>Mason and Markdown</title>
    </head>
    <body>
% $.Markdown \{\{
      <% inner() %>
% \}\}
    </body>
  </html>
</%augment>

then your page can contain just Markdown syntax, here's an index.mc example page (an empy line at the beginning seems to be needed here):

# Only Markdown

This page will only contain Markdown syntax, but it will be converted to HTML:

% foreach my $i (qw(one two three)) {
  - <% $i %>
% }

yes you can still use perl code on it!

Adminer for Oracle

I'm becoming a fan of Adminer, a database management tool written in PHP, with lots of features and consisting only of a single PHP file, and very easy to deploy to an Apache web server. I have started to develop a plugin adminer-plugin-dump-markdown so I can quickly convert queries and tables to Markdown format, ready to be included in my e-mails or in my blog posts.

I wanted to connect to an Oracle database, but I got the following message error:

No extension

None of the supported PHP extensions (OCI8, PDO_OCI) are available.

I quicly checked my server and the oci8.so library wasn't available:

find / -name oci8.so 2>&1 | grep -v "Permission denied"

so here's how I proceeded:

  1. download oracle instant client RPMs (Basic + Devel) from the Oracle website, and installation using yum install instant-client-etc.ect.rpm;
  2. make sure that pecl tool is installed (if not yum install php-pear). Pecl can manage PHP extensions from a public repository;
  3. install the oci8 extension with pecl install oci8 (for PHP7, for older PHP need to specify oci8 version);
  4. add the extension=oci8.so row to the php.ini configuration file on the [PHP] section.

Once the webserver is restarted, I can access an Oracle instance. I can use a service string like this:

(DESCRIPTION = (ADDRESS_LIST = (ADDRESS = (PROTOCOL = TCP)(HOST = host)(PORT = 1521))) (CONNECT_DATA = (SERVICE_NAME = service)))

without having to set the connection on the tnsnames.ora file. Adminer works great also on Oracle databases!

Pentaho BI integration with Active Directory

This is a quick guide of how to integrate the Pentaho BI platform with Active Directory. It has been tested on version 5 and 6, it's not yet tested on version 7.

The first file that has to be modified is biserver-ce\security.properties where we have to specify that we want to use LDAP authentication:

provider=ldap

Then we have to modifiy the file biserver-ce\pentaho-solutions\system\applicationContext-security-ldap.properties which has to be updated with the actual Active Directory parameters.

  • our domain name is example.com and our domain controllers will answer with example.com
  • our user with read permissions on the AD schema is browsingad@example.com
  • we have to create a OU Example Users\Groups\Pentaho Roles where we will create our groups (for example Pentaho Administrators, Pentaho Read Only, Pentaho Dashboards etc.) with a proper description

This is how the file will look like:

contextSource.providerUrl=ldap\://example.com\:389/DC\=example,DC\=com
contextSource.userDn=CN\=browsingad,OU\=Example Users,DC\=example,DC\=com
contextSource.password=password

userSearch.searchBase=OU=Example Users
userSearch.searchFilter=(samaccountname\={0})

populator.convertToUpperCase=false
populator.groupRoleAttribute=description
populator.groupSearchBase=OU\=Pentaho Roles,OU\=Groups,OU\=Example Users
populator.groupSearchFilter=(member\={0})
populator.rolePrefix=
populator.searchSubtree=true

allAuthoritiesSearch.roleAttribute=description
allAuthoritiesSearch.searchBase=OU\=Pentaho Roles,OU\=Groups,OU\=Example Users
allAuthoritiesSearch.searchFilter=(objectClass\=group)

allUsernamesSearch.usernameAttribute=samaccountname
allUsernamesSearch.searchBase=OU\=Example Users
allUsernamesSearch.searchFilter=(objectClass\=Person)

adminRole=cn\=Pentaho Administrators,OU\=Pentaho Roles,OU\=Groups,OU\=Example Users
adminUser=cn\=admin.user,OU\=IT Staff,OU\=Example Users

Finally we can modify the file \biserver-ce\pentaho-solutions\system\pentaho.xml to hide test users:

<login-show-users-list>false</login-show-users-list> 
<login-show-sample-users-hint>false</login-show-sample-users-hint>

and also our logo:

biserver-ce/pentaho-solutions/system/common-ui/resources/themes/images/puc-login-logo.png

Scheduling Kettle Jobs

Pentaho Data Integration is an open source tool that provides Extraction, Transformation, and Loading (ETL) capabilities. While it's an essential DWH tool, I use it quite a lot also as an integration tool, where it performs well.
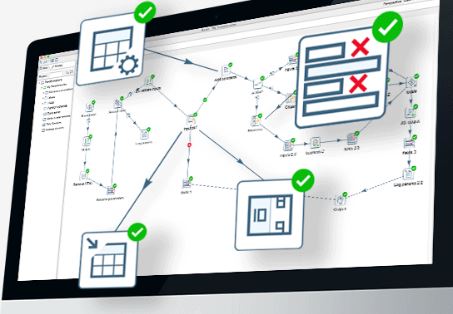
Pentaho Kettle

For example, we use it to populate a table with the current load of our emergency rooms, then a Perl application will publish the contents of the table in JSON format, and finally a Web Application and an Android Application read the content of the JSON and shows the data to the users formatted in a nice way:
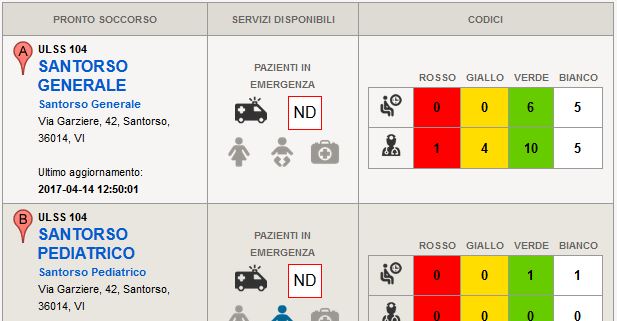
First Aid

We also use it to transfer historical data from legacy applications to the new ones. To distribute patients data between different softwares of different vendors. To do quality checks on our tables, and generate automatically emails with alarms. Or to fetch XML or Excel files we get from web services, and integrate the contents into our live systems. To prepare monthly TXT or Excel or XML extractions.

All those tasks are managed by some jobs that calls multiple transformations, but I have to schedule those jobs somehow. And I want to keep track of which jobs are run, how long they took to execute, which ones failed.

But how's an effective way to do all of this?

This is what I am using, and I find it very flexible and pretty elegant.

Windows Scheduler

I wanted to use the standard Windows Scheduler, not the Pentaho scheduler. For Linux machines the procedure is very similar. First of all I have created a StartJob.cmd batch file, that accepts only one parameter: the job to be executed. Here's how it looks like:

@echo off

set kitchen="D:\Pentaho\kettle\data-integration\kitchen.bat"

set repository="Repository ULSS4"
set repository_user=username
set repository_pass=password

set job_dir="/Updates"
set job_name=%1
set log="D:\Script\Spoon\log\"%2".log"

%kitchen% /rep:%repository% /user:%repository_user% /pass:%repository_pass% /dir:%job_dir% /job:%job_name% /level:Basic >> %log%

We can start a job very simply with the following command:

C:\>StartJob.CMD "job_updates_15min"

which is more convenient than calling the kitchen.bat batch file directly since most parameters are pre-configured already.

I then scheduled a list of jobs to be executed at different intervals, e.g.

  • job_updates_daily
  • job_updates_1h
  • job_updates_mondays
  • job_updates_1th_month

this has to be configured only once, then we won't touch the task scheduler anymore.

Each of those jobs will contain a list of sub-jobs that will be executed (e.g. job_update_json, job_send_email, ...) and that will perform some specific tasks.

The Scheduled Jobs

Every scheduled job (daily, 1h, 15min, etc.) is structured this way:

  • first we define the starting point for job execution
  • then we execute a transformation that sets in a variable the current date (for logging reasons)
  • finally, we insert in sequence all the jobs we actually want to execute (e.g. job_update_json, job_send_email, ...)

this is how it looks like:
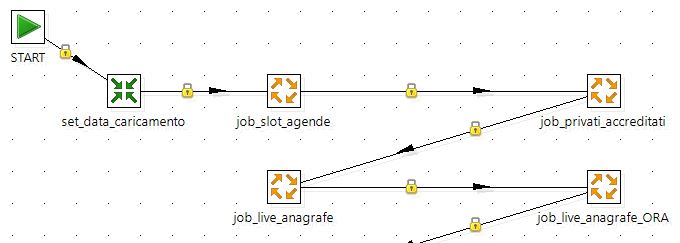
Daily Job

make sure that connections are black (unconditional), so a failing job won't prevent the following jobs to be executed.

Whenever I prepare a new job and I want to schedule it daily, I will add this new job to the job_updates_daily outer job. And whenever I change my mind and I want to execute it hourly, I will just remove it from the job_updates_daily and add it to the job_updates_1h job.

The Log Table

The main goal of the log table is to keep track of all tasks (jobs/transformations) that have been executed, when they have been executed, how long they took, how many rows were updated, which ones failed.

The basic table structure is defined this way (in PostgreSQL syntax):

create table log_updates (
  id serial primary key,
  data_esecuzione varchar(20),
  flagtipotabella varchar(20),
  nometrasformazione varchar(40),
  dtiniziocaricamento timestamp,
  dtfinecaricamento timestamp,
  esitocaricamento int,
  read int,
  written int,
  updated int
  unique (data_esecuzione, flagtipotabella, nometrasformazione)
)

and it will look like:

id data_esecuzione flagtipotabella nometrasformazione dtiniziocaricamento dtfinecaricamento esitocaricamento read written updated
1 2017-04-14 DWH dim_doctors_update 2017-04-14 15:00:01 2017-04-14 15:03:35 0 743 3 86
2 2017-04-14 Web Apps update_ps_json 2017-04-14 15:03:37 2017-04-14 15:05:54 2
3 2017-04-14 Web Apps update_patients 2017-04-14 15:05:59 1

here we can see that:

  • the task DWH / dim_doctors_update was executed successfully (esitocaricamento=0)
  • the task Web Apps / update_ps_json ended up with an error (esitocaricamento=2)
  • the task Web Apps / update_patients didn't finish yet (maybe it's still running or maybe it hang...).

Adding a new job on the log table

Whenever a new job starts, a single row with esitocaricamento=1 will be generated:

data_esecuzione flagtipotabella nometrasformazione esitocaricamento dtiniziocaricamento
2017-04-14 DWH dim_doctors_update 1 2017-04-14 15:00:01

and an Insert/Update step using the lookup keys (data_esecuzione, flagtipotabella, nometrasformazione) will add it to the logs table (or will reset the row if the same task will be performed multiple times on the same day)

Updating the job status

Then, whenever the task end succesfully, another row will be generated. with the same lookup keys ('2017-04-14', 'DWH', 'dim_doctors_update') but an updated status esitocaricamento=0 and an updated current_timestamp as the end datetime (and eventually the number of rows read, written and updated).

I'm using an Insert/Update step also here, with the same lookup keys, so the status will be updated from 1 to 0 (great!), the datetime_start column will be left untouched but the datetime_end, read, written, updated columns will be updated.

Whenever the task end unsuccesfully, we are doing the same but we will update the status from 1 to 2.

If the tast is still running, the status will be 1. This solves a common logging problem - first we insert a row with the status "executing", then the status will be updated to "completed" once we are sure that the task ended properly.

Setting the current date in a variable

This task is for logging pourposes. We are going to run a query that returns the current date:

select current_date as currentdate from dual

and save in the data_caricamento variable. Here's how it will look like:
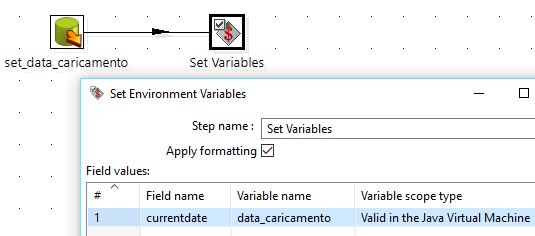
Set Load Date

(here I assume that having a daily log is fine: only the last execution of the day will be logged, previous ones will be overwritten)

How a standard Job will look like

All standard jobs that performs a specific task will share a similar structure:

  • we define a starting point
  • then we will call the transformation general_log_start (it puts on the log table a row informing us that that the job has started)
  • then we call one or more transformations (or sub-jobs) that will perform the taks we need, eg. import some data, update a table, etc.
  • when everything is okay (green connections) we will call the general_log_end transformation called general_log_end OK
  • when anything goes wrong (red connections) we will call the general_log_end transformation called general_log_end KO

and here's how it will look like in Kettle:
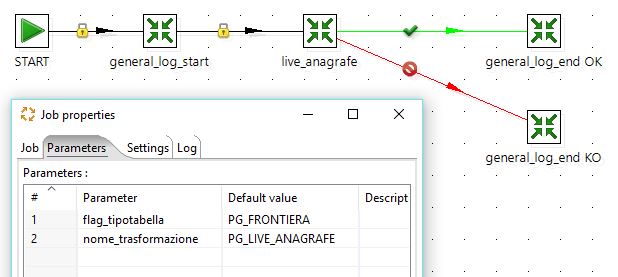
Standard Job

as we can see from the picture above, I have defined two parameters:

  • flagtipotabella eg. DWH, Web App, Other
  • nometrasformazione eg. job_update_patients, job_send_email

those parameters will be used for logging purposes by the general_log_start and general_log_end jobs.

General Log Start

This task will insert a new row on the logs table with the following informations:

  • data_caricamento which is the current date time of the shceduled task
  • flagtipotabella, taken from the parameters of the outer job
  • nometrasformazione, taken from the parameters of the current job
  • the current date time, which will be the start date/time
  • esitocaricamento=1, the task has been started
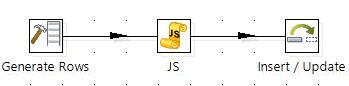
General Log Start

Here's how the generate rows step will look like:
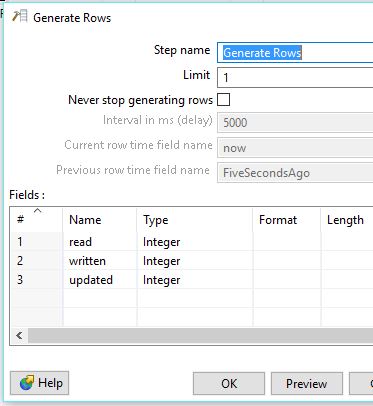
Generate Rows

Here's a JavaScript step that will get the parameters from the outer job:

var dtcaricamento = getVariable("data_caricamento","");
var nometrasformazione = getVariable("nome_trasformazione","no");
var flagtipotabella = getVariable("flag_tipotabella","no");
var dtiniziocaricamento = new Date();
var dtfinecaricamento;
var esitocaricamento = 1

and here's how the Insert/Update step will look like:
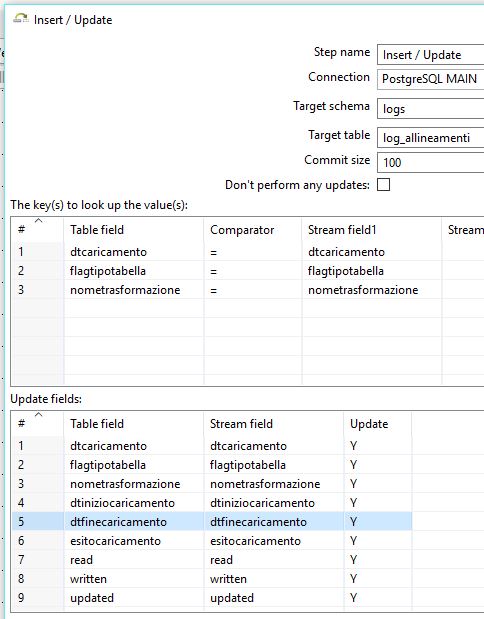
Insert/Update

General Log End

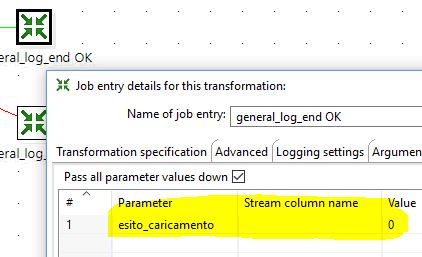
The general log end is very similar to the general log start, but it will either mark the task as Completed (esitocaricamento=0) or Failed (esitocaricamento=2). The parameter esitocaricamento has to be defined as a parameter (right click -> Edit job entry -> parameters).
Insert/Update

only the JavaScript code is different:

var dtcaricamento = getVariable("data_caricamento","");
var nometrasformazione = getVariable("nome_trasformazione","");
var flagtipotabella = getVariable("flag_tipotabella","");
var esitocaricamento = getVariable("esito_caricamento","");

var read = getVariable("LINES_READ","") | "";
var written = getVariable("LINES_WRITTEN","") | "";
var updated = getVariable("LINES_UPDATED","") | "";

setVariable("read", null, "p");
setVariable("written", null, "p");
setVariable("updated", null, "p");

var dtfinecaricamento;

if (esitocaricamento == '0') {
  dtfinecaricamento = new Date();
} else {
  dtfinecaricamento = null;
}

Transformation

The transformation will just perform the actual task, something like reading data from one table, perform some calculations, writing the output to another table.

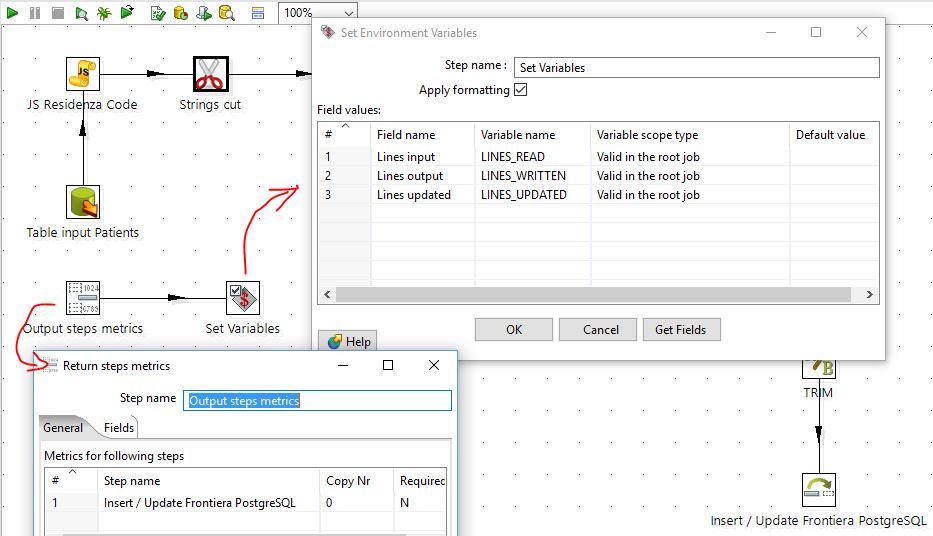
The interesting part here is to use an Output Step Metrics to get the number or rows read, written, updated and make it available to the outer job where the General Log End transformation will save those values in the logs table:
Insert/Update

Conclusion

Setting up some scheduled task using this technique requires some more work the first time, but once the system is properly set up managing scheduled tasks becomes fun!
MySQL and Full Outer Join

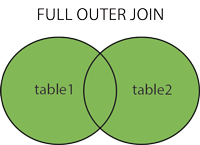
In SQL, a full outer join is a join that returns all records from both tables, wheter there's a match or not:

Full Outer Join

unfortunately MySQL doesn't support this kind of join, and it has to be emulated somehow. But how?

In SQL it happens often that the same result can be achieved in different ways, and which way is the most appropriate is just a matter of taste (or of perormances).

But this time the question is a little controversial, even on StackOverflow not everyone agrees and the solution marked as correct isn't actually the correct one.

Suppose we have the following tables:

Customers:

company_id name
1 Abc Company
2 Noise Inc.
3 Mr. Smith

Partners:

company_id name
2 Noise Inc.
4 The Pages

a full outer join would be written as:

select
  c.name, p.name
from
  customers c full outer join partners p
  on c.company_id = p.company_id

and the expected result is:

name name
Abc Company
Noise Inc. Noise Inc.
Mr. Smith
The Pages

to get the same result we have to combine a left outer join query:

select c.name, p.name
from
  customers c left join partners p
  on c.company_id = p.company_id

with a right outer join query:

select c.name, p.name
from
  customers c right join partners p
  on c.company_id = p.company_id

(the right join is quite uncommon because it's more difficult to read, and is equivalent to a left join with the order of the tables switched).

We could combine both queries with an UNION ALL clause, but this would return some duplicates (all rows where the join succeeds will be returned twice).

We could then use an UNION clause which will remove duplicates, but it will fail if one of the table has no primary key or unique constraints, or if the selected columns are not unique.

We could also use a different approach:

select c.name, t.name
from
  (select company_id from customers UNION
   select company_id from partners) n
  left join customers c on n.company_id = c.company_id
  left join partners p on n.company_id = p.company_id

which is often a good solution, but would fail if we allow the company_id to be NULL in one or both tables (a full outer join will return those rows, while the previous one won't).

The most general solution is this:

select c.name, p.name
from
  customers c left join partners p
  on c.company_id = p.company_id

union all -- don't remove duplicates

select c.name, p.name
from
  customers c right join partners p
  on c.company_id = p.company_id
where
  c.company_id is null

duplicates, if already present on the source tables, won't be removed. And the anti-join pattern on the second query assures that we are not introducing new duplicated rows.